Rss

Archives for : mikrotik

SETUP MIKROTIK AS GATEWAY

Now, I will let you know how to setup MIkrotik as Gateway server.
  1. First, install Mikrotik RouterOS on your server PC.
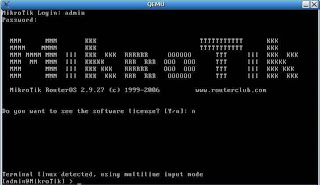
  2. Login mikrotik with console.
MikroTik v2.9.7
Login: admin
Password:
3. After that, you can go inside on Mikrotik Server. Your username is “admin” and without password by default.
4. If you want to setup password:
[admin@Mikrotik] > password
old password: ****
new password: *******
retype new password: *******
[admin@ Mikrotik]] >
5. To identify your interface on your PC that installed on MIkrotik
[admin@Mikrotik] > interface print
Flags: X - disabled, D - dynamic, R - running
# NAME TYPE RX-RATE TX-RATE MTU
0 R ether1 ether 0 0 1500
1 R ether2 ether 0 0 1500
2 R ether2 ether 0 0 1500
[admin@Mikrotik] >
6. Give IP address on every interface that you’ve installed.
[admin@Mikrotik] > ip address add address=192.168.0.1
netmask=255.255.255.0 interface=ether1
[admin@Mikrotik] > ip address add address=172.16.0.1
netmask=255.255.255.0 interface=ether2
7. To see the configuration of IP address:
[admin@Mikrotik] >ip address print
Flags: X - disabled, I - invalid, D - dynamic
# ADDRESS NETWORK BROADCAST INTERFACE
0 192.168.0.1/24 192.168.0.0 192.168.0.63 ether1
1 172.16.0.1/24 172.16.0.0 172.16.0.255 ether2
[admin@Mikrotik] >
8. Give the default gateway. For the example, gateway for internet connection is 192.168.0.254
[admin@Mikrotik] > /ip route add gateway=192.168.0.254
9. Now, see the routing table on Mikrotik System.
[admin@Mikrotik] > ip route print
Flags: X - disabled, A - active, D - dynamic,
C - connect, S - static, r - rip, b - bgp, o - ospf
# DST-ADDRESS PREFSRC G GATEWAY DISTANCE INTERFACE
0 ADC 172.16.0.0/24 172.16.0.1 ether2
1 ADC 192.168.0.0/26 192.168.0.1 ether1
2 A S 0.0.0.0/0 r 192.168.0.254 ether1
[admin@Mikrotik] >
10. Test connection to gateway to make sure the configuration is correct.
[admin@Mikrotik] > ping 192.168.0.254
192.168.0.254 64 byte ping: ttl=64 time<1>
2 packets transmitted, 2 packets received, 0% packet loss
round-trip min/avg/max = 0/0.0/0 ms
[admin@Mikrotik] >
11. Setup the DNS on MIkrotik.
[admin@Mikrotik] > ip dns set primary-dns=192.168.0.10 allow-remoterequests=no
[admin@Mikrotik] > ip dns set secondary-dns=192.168.0.11 allow-remoterequests=no
12. To see the configuration of DNS:
[admin@Mikrotik] > ip dns print
primary-dns: 192.168.0.10
secondary-dns: 192.168.0.11
allow-remote-requests: no
cache-size: 2048KiB
cache-max-ttl: 1w
cache-used: 16KiB
[admin@Mikrotik] >
13. To test the connection, just use “ping” command to domain:
[admin@Mikrotik] > ping yahoo.com
216.109.112.135 64 byte ping: ttl=48 time=250 ms
10 packets transmitted, 10 packets received, 0% packet loss
round-trip min/avg/max = 571/571.0/571 ms
[admin@Mikrotik] >
14. Setup masquerading. If Mikrotik that we used as gateway server, we should masquerading due to be connected into internet.
[admin@Mikrotik] > ip firewall nat add action=masquerade outinterface= ether1 chain: srcnat
[admin@Mikrotik] >
15. To see the configuration of Masquerading:
[admin@Mikrotik] ip firewall nat print
Flags: X - disabled, I - invalid, D - dynamic
0 chain=srcnat out-interface=ether1 action=masquerade
[admin@Mikrotik] >
MIKROTIK INTRODUCTION

Mikrotik is Operating System based on linux that used become network router. To managing a network, usually admin use Windows Application to do it, with WinBox. Mikrotik can be installed in mainstream or low end computer. So, don’t need high spec computer to run Mikrotik. But if you want Mikrotik to manage more complex network, you should think about your computer spec.
Minimum spec for your computer to run Mikrotik:
· Intel Pentium II
· Memory 128 MB
· 2 set NIC (LAN card)
· Hardisk 1 GB
· CD drive
Mikrotik is a shareware with license. Mikrotik give trial mode on first 24 hours. You can buy the CD or download the image on http://www.mikrotik.co.id/getfile.php?nf=mikrotik-3.4.iso
Mikrotik has variety facility:
· RIP, OSPF, BGP for protocol routing
· Statefull firewall
· HotSpot for Plug and Play access

· GUI admin


To start install mikrotik:
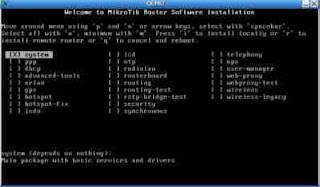
just run the CD or iso image then choose the package that you want to install. if you are beginner, you should choose all the packages.

MAKE DHCP SERVER ON MIKROTIK

MAKE DHCP SERVER ON MIKROTIK
Now, if you want your client that connected on your gateway get the automatic IP address, we should setup the DHCP server on Mikrotik Server.
1. To make DHCP, first we setup the address pool
/ip pool add name=dhcp-pool ranges=172.16.0.10-172.16.0.20

2. Add DHCP network and the gateway that will be distributed to clients.
/ip dhcp-server network add address=172.16.0.0/24 gateway=172.16.0.1
3. Add DHCP server
/ip dhcp-server add interface=ether2 address-pool=dhcp-pool
4. See the status of DHCP server
[admin@Mikrotik] > ip dhcp-server print
Flags: X - disabled, I - invalid
# NAME INTERFACE RELAY ADDRESS-POOL LEASE-TIME ADD-ARP
0 X dhcp1 ether2
5. To activate the DHCP system, give the “enable” command
/ip dhcp-server enable 0
6. Test if client got automatic IP address.

SETTING NAT ON MIKROTIK (using WinBox)

NAT (Network Address Translation) is method to make a Public IP address become several local IP address. We know that IPv4 is limited source addressing, so, we must use it very efficiently.
In mikrotik, NAT is called “masquerade”.
For example, if you have one IP public such as 202.51.172.54. you can divide it to several local IP . for example, you divide the public IP with local network 192.168.1.0.

1. First, setting the two LAN card, first for local address, and the other for public address.
2. After that, open winbox and choose tab “Firewall” to divine the IP public


3. Next, choose window “NAT Rule”
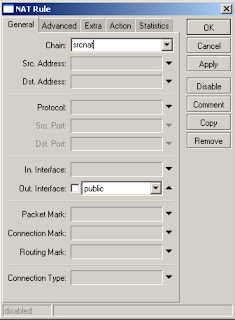
4. Choose General and fill the column “Chain” =“srcnat” and out interface = “public”


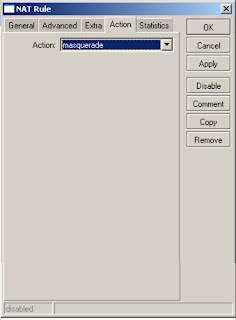
5. Go to action tab and choose action = “masquerade”


6. Your Local Area Connection now have one IP public to connect to the internet.

source: www.indonesiacyber.net